Pinterest Project number two, done...well, three if you're counting the pumpkin project. This pinterest inspired project idea spun from the picture below - of a peg board turned jewelry holder. After I finished my knife project, I realized I had a bunch of left over paint that I wanted to use for this peg board project that I felt was eerily similar to the original picture...
The original tutorial instructed that Lowes was the place to go! So I drove 15 minutes out of the way and made the trip. I found my peg board ($5) and was on a hunt for some S-hooks to hang my jewelry. This was not the easy task I originally thought. One hour later and two Lowe's associates down, I had purchased a pack of only 6 S-hooks ($1.40) that the nice man had to physically bend to be able to fit. I'm all about gettin' gangsta with it, but for $1.40 per 6? No thanks.
I also picked up two baskets for my bangles and watches, and painted them as well.
*Disclaimer - the associate said all stores carry different items so your local Lowe's may have what you're looking for.
Yesterday I ran to old faithful, Home Depot, and was able to find the S-hooks I needed in a pack of 100! I can't remember the price (or the exact size) but it was fairly cheap, and no bending necessary! In addition to the S-hook pickup, I also picked up a piece that I use to hang my scarves.
I give a big thanks to the hubs for doing the hanging for me, while I tended to picking up the house and doing laundry last night... you know, woman's work. When I was finished, it was a nice surprise to see the finished product hanging in my closet. Love.
In the famous words of Jay Z, on to the next one...
Tuesday, November 1, 2011
Monday, October 31, 2011
Knife Block Beautification
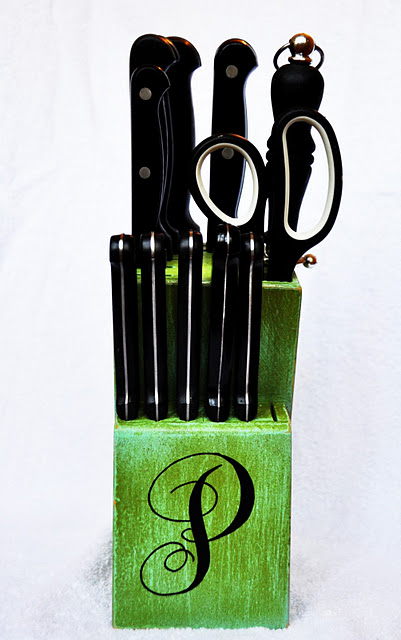
Over the weekend, I put the finishing touches on my Knife Block Beautification Project. The idea to update my boring old wooden knife block came from Pinterest - shocker. My inspiration picture is below...
OFF to Hobby Lobby I went, in search of these matching color combos. I picked up two Krylon Spray Paint colors, Ocean Breeze and Ivy Leaf...
First I sprayed Blue Ocean Breeze.
Then came Ivy Leaf...
I wasn't TOO worried about the second coat, as I was encouraging the blue to shine through.
*Helpful Hint - follow instructions on shaking for 2 minutes. Helps WONDERS!*
After drying and sanding down, here is my finished project...
Since I don't have a steady hand for calligraphy, nor did I want to invest in a stencil and more paint - I purchased (what I thought was) a stick on "G." Turns out, it was an iron on letter - DOH! - but with a dab of super glue, who could tell. ;)
Obviously it isn't the fabulous starter picture, but I will say, it is better than the original wood and a fun pop of color in an otherwise boring kitchen.
OFF to Hobby Lobby I went, in search of these matching color combos. I picked up two Krylon Spray Paint colors, Ocean Breeze and Ivy Leaf...
First I sprayed Blue Ocean Breeze.
Then came Ivy Leaf...
I wasn't TOO worried about the second coat, as I was encouraging the blue to shine through.
*Helpful Hint - follow instructions on shaking for 2 minutes. Helps WONDERS!*
After drying and sanding down, here is my finished project...
Since I don't have a steady hand for calligraphy, nor did I want to invest in a stencil and more paint - I purchased (what I thought was) a stick on "G." Turns out, it was an iron on letter - DOH! - but with a dab of super glue, who could tell. ;)
Obviously it isn't the fabulous starter picture, but I will say, it is better than the original wood and a fun pop of color in an otherwise boring kitchen.
Friday, October 28, 2011
Frugal-ish Friday
In my last post, I talked about how I still crave the MK Tortoise Watch... but after seeing this little gem, I think I'll take this (as well).
The Michael Kors Blair Espresso Watch - two of my favorite things: MK Watches and Coffee.
After getting smacked in the face with the $250 price tag - Ouch, Michael, Ouch - I found a couple options for less(er) that I would equally enjoy around my wrist.
Stella Stainless Steel Watch in Brown - $115
Stella Boyfriend Aluminum Watch in Brown - $135
I, all of a sudden, feel that Christmas is TOO far away. Santa?!
Wednesday, October 26, 2011
What I Want Wednesday
Now that I can finally see the light at the end of the tunnel, my mouth is beginning to drool over all the shopping I've missed out on over my money's extended vacation. Let's not waste any time...
I've been gaga over ordering a pair of Hunter Boots, and after missing Gilt's Sale of Hunter Boots a couple months back, I've been slapping myself in the face ever since. I LOVE the original green Hunter Boot. Want #1.
Want #2 comes as no surprise. Everyone knows I love watches and have one in almost every color (necessary). Since last Christmas, I've been wanting this tortoise watch by Mr. Kors. This fall is no exception.
Want #3 may be a fashion season behind, but I still love. A faux fur vest... and I also want to look this cute in it. Is that considered Want #4? We will just bundle it into #3.
*After a recent trip to TJ Maxx, I found one I may return to purchase. However, I think it was $40...and at TJ Maxx? I might as well hit up H&M... which is where this darlin' vest above is from.
Want #4 - A sunburst mirror. I mean, doesn't this just brighten up your day? Pun intended...
Want #5 - Infinity Scarf
I'm tired of being gangster with my scarves in trying to fake my way into infinity. I will take one in every color please...
Want #6 - Conair Bun Maker
No No, Conair hasn't merged into the baking industry. They have come out with a cheap ($4 at Walgreens) Bun making kit that doesn't require you to chop up your husband's socks! Dying to give this a go.
Want #7 - Purty, chunky, statement necklaces
These below are $16 from NordstromAnd if you're not bored with my list yet, I'll spare you the pictures...
Wants #8, 9, 10, 11, 12, 13, 14, 15...
Green Utility Jacket, Red Jeans, Cross Body Bag, new weave, leggings in every color, Lots of makeup, ankle cowboy booties (*snicker), and lots of ponchos. :)
Now - question is, how do I get my husband to read this and shower me with unnecessary gifts? Want #16 - figure out a way...
Tuesday, October 18, 2011
Do you like to... "DO IT, Yourself?"
Unless you have lived under a rock, or have an actual life that doesn't involve sitting on a computer for 8+ hours a day, you know what Pinterest is. I am convinced that it is swiftly taking over the world... or at least my world.
In a recent PIN, I discovered a DIY project I wanted to tackle.
Seems simple enough, right? Well, I'm sure it is, but not for this Suzy Homemaker in training. Regardless of my mishaps, I'll explain what I did and hopefully you can do better.
I went to both Michaels and Hobby Lobby for fake pumpkins. I purchased 3 from both stores, and realized the Hobby Lobby purchase was much better. They even have pre-cut bottoms so they allow for easy stacking.
I purchased the "B" and first "O" from Michaels, and the last "O" from Hobby Lobby. I know what you're thinking, that's a lot of trips for wood letters and pumpkins. Let me clarify that I went to Michaels FIRST and purchased everything I could find. Hobby Lobby was my second trip, so if I found a "better" product, I purchased that instead. Moving on...
Michaels didn't have Krylon's Glitter Blast spray paint, but Hobby Lobby did. HURRAY! I purchased the Glitter Blast spray paint in Starry Night for the black pumpkin and planned to purchase Orange Burst for the Orange pumpkin. Obviously every other house wife in Alabama decided that Orange Burst was the color of the season, therefore, they were sold out. I tried to compensate by purchasing plain Orange and plain Glitter Spray. This resulted in a "glittery" traffic cone, which I later was able to tone down using the Glitter Copper Color (I can't remember the exact name).
I then took the wood letters and spray painted them the opposing colors for their respective pumpkin. Easy enough right?
It was now time to glue the letters on to their 'home.' I started with the "B" on the smallest pumpkin. I used super glue, because I had tossed my hot glue gun a long time ago for lack of being crafty. Dumb. Mistake. Super Glue is sneaky. It will get on your fingers in a flash, and you won't know what hit ya! Did you know that super glue burns like fire as well? Now you know...
After myover-dramatized third degree burn (and failure at getting the letter to actually "stick"), I threw my hands up and was done - insert cuss word. My sweet hubby came over and decided to step in. He finished the other 2 pumpkins, and even set it all up outside for me. Such a sweetie. :)
Here is our finished product via IPhone... and a night. Great quality. ;)
Who would know that there are shirts stuffed down in our flower pot to allow our display to sit up? He's so smart. He then took some grass from our flower bed and tucked it around the edges. Such a clever boy. My mind was telling me I need to go BACK to Hobby Lobby for moss. This is a much better (and cheaper) route.
Tonight we are going to Old Skool carve these pumpkins, which we got for $5 at Kroger. I'm talking, free hand with a steak knife. No etch-a-sketch here! I have a feeling I will be *inserting cuss words* again tonight and pray for 10 fingers when the sun comes up tomorrow. Wish us luck!
In a recent PIN, I discovered a DIY project I wanted to tackle.
Seems simple enough, right? Well, I'm sure it is, but not for this Suzy Homemaker in training. Regardless of my mishaps, I'll explain what I did and hopefully you can do better.
I went to both Michaels and Hobby Lobby for fake pumpkins. I purchased 3 from both stores, and realized the Hobby Lobby purchase was much better. They even have pre-cut bottoms so they allow for easy stacking.
I purchased the "B" and first "O" from Michaels, and the last "O" from Hobby Lobby. I know what you're thinking, that's a lot of trips for wood letters and pumpkins. Let me clarify that I went to Michaels FIRST and purchased everything I could find. Hobby Lobby was my second trip, so if I found a "better" product, I purchased that instead. Moving on...
Michaels didn't have Krylon's Glitter Blast spray paint, but Hobby Lobby did. HURRAY! I purchased the Glitter Blast spray paint in Starry Night for the black pumpkin and planned to purchase Orange Burst for the Orange pumpkin. Obviously every other house wife in Alabama decided that Orange Burst was the color of the season, therefore, they were sold out. I tried to compensate by purchasing plain Orange and plain Glitter Spray. This resulted in a "glittery" traffic cone, which I later was able to tone down using the Glitter Copper Color (I can't remember the exact name).
I then took the wood letters and spray painted them the opposing colors for their respective pumpkin. Easy enough right?
It was now time to glue the letters on to their 'home.' I started with the "B" on the smallest pumpkin. I used super glue, because I had tossed my hot glue gun a long time ago for lack of being crafty. Dumb. Mistake. Super Glue is sneaky. It will get on your fingers in a flash, and you won't know what hit ya! Did you know that super glue burns like fire as well? Now you know...
After my
Here is our finished product via IPhone... and a night. Great quality. ;)
Who would know that there are shirts stuffed down in our flower pot to allow our display to sit up? He's so smart. He then took some grass from our flower bed and tucked it around the edges. Such a clever boy. My mind was telling me I need to go BACK to Hobby Lobby for moss. This is a much better (and cheaper) route.
Tonight we are going to Old Skool carve these pumpkins, which we got for $5 at Kroger. I'm talking, free hand with a steak knife. No etch-a-sketch here! I have a feeling I will be *inserting cuss words* again tonight and pray for 10 fingers when the sun comes up tomorrow. Wish us luck!
Monday, October 17, 2011
Baby Talk
Update on the Bambino Life -
In our recent trip to Bham this weekend, my mother-in-law, sister-in-law (Mary) and myself went to register at Babies-R-Us. It was nice to have a 'Vet' amongst us as Mary could tell me what was necessary and what was not. We walked the store for about 45 mins, while Mary pointed to items telling me "Scan this"... "Scan that"... it was great. If it wasn't for her, I'd still be on aisle 1, staring at bottles and nipples - who knew they made 876 different types of nipples! Lord help me...
After registering for some necessities - we walked over to Pottery Barn Kids, where we picked a crib... thank GOD! I've been staring at cribs online for weeks and let me tell ya, they all look the same. I tried picking a color scheme that I wanted to go with, thinking that would help in my search, but alas - it only got me to fall in LOVE with a crib that cost $999.
Yup! How perfect is that?! It's gorgeous and the distressed look is to die for.
Moving on...
While in Pottery Barn, THANKFULLY they only had a select few cribs in store. It helps my indecisive brain to only have 3 options to choose from. After looking at Pottery Barn's version of "white" vs. their espresso color - I decided to go with their Kendall Collection, in espresso. On Sale $399
I've decided not to choose a "theme" for our nursery, rather make it simple. I'm in LOVE with this Restoration Hardware bedding. So simple. On Sale $295
...again, that dang crib. It will haunt my dreams. I want to sleep in that thing! Sheesh.
With the brown crib, I'm dying to find a distressed/vintage type of dresser. Some off color. Maybe this...
I plan to hit up some antique shops soon - see what I can find.
Found these darling signs to add pops of color in the room.
Plan to recreate them myself, making the grey areas more 'brown' - or have the awesome Leslie Brown take charge (probably best). Either frame them in white or she suggested putting them on wooden posts. Like, a distressed piece of wood. Sounds interesting to me, but I'm having a hard time getting a "visual."
Hopefully this will all come together, nicely. Maybe once we get the crib in there, we will be able to get more ideas. But for now, this is a start. :)
In our recent trip to Bham this weekend, my mother-in-law, sister-in-law (Mary) and myself went to register at Babies-R-Us. It was nice to have a 'Vet' amongst us as Mary could tell me what was necessary and what was not. We walked the store for about 45 mins, while Mary pointed to items telling me "Scan this"... "Scan that"... it was great. If it wasn't for her, I'd still be on aisle 1, staring at bottles and nipples - who knew they made 876 different types of nipples! Lord help me...
After registering for some necessities - we walked over to Pottery Barn Kids, where we picked a crib... thank GOD! I've been staring at cribs online for weeks and let me tell ya, they all look the same. I tried picking a color scheme that I wanted to go with, thinking that would help in my search, but alas - it only got me to fall in LOVE with a crib that cost $999.
Yup! How perfect is that?! It's gorgeous and the distressed look is to die for.
Moving on...
While in Pottery Barn, THANKFULLY they only had a select few cribs in store. It helps my indecisive brain to only have 3 options to choose from. After looking at Pottery Barn's version of "white" vs. their espresso color - I decided to go with their Kendall Collection, in espresso. On Sale $399
I've decided not to choose a "theme" for our nursery, rather make it simple. I'm in LOVE with this Restoration Hardware bedding. So simple. On Sale $295
...again, that dang crib. It will haunt my dreams. I want to sleep in that thing! Sheesh.
With the brown crib, I'm dying to find a distressed/vintage type of dresser. Some off color. Maybe this...
I plan to hit up some antique shops soon - see what I can find.
Found these darling signs to add pops of color in the room.
Plan to recreate them myself, making the grey areas more 'brown' - or have the awesome Leslie Brown take charge (probably best). Either frame them in white or she suggested putting them on wooden posts. Like, a distressed piece of wood. Sounds interesting to me, but I'm having a hard time getting a "visual."
Hopefully this will all come together, nicely. Maybe once we get the crib in there, we will be able to get more ideas. But for now, this is a start. :)
Friday, October 14, 2011
Mirrored Side Tables
I'm not entirely sure where or when my obsession began with NEEDING mirrored side tables for my bedroom, but it's bad. I've been drooling for many many moons over the Pottery Barn collection but obvi, I just can't justify dropping that kind of dough. I found a few other options for "less" but with no furniture in my nursery, and only 3 months to go, I figured I might need to invest my money in a crib... or do you think I could just pad the drawers and have him sleep there? Something to consider...
Pottery Barn - $399
Pier One - 229.95
Target - $89.99
Subscribe to:
Posts (Atom)