It's hard to keep my family abroad up to date on all we are doing with our new home, our nursery and my ever growing belly. I figured this would be a nice way for them to stay included and something fun for me to look back on after Baby Max arrives.
Step 1: Received a gift from the most wonderful Mother In Law in all the land.
Pottery Barn Crib - assembled by the two feet you see in this picture. Thanks Dear!
*distraction provided by fur baby under the crib*
Pottery Barn Crib - assembled by the two feet you see in this picture. Thanks Dear!
*distraction provided by fur baby under the crib*
Step 2: Hit up your local flea market for inspirational items.
I couldn't go a day without someone asking what my "theme" was for the nursery... what colors were we going to use... where will we get our bedding?
I honestly had NO vision of what I wanted in a nursery. All I knew was that I didn't want "baby blue" and LOVED everything from Restoration Hardware - minus the cost - and anything Vintage-ey.
One Saturday morning, the hubster and I set out to Trinity, AL to visit Gillespie's Flea Market which is about 30 mins away from us. Not too shabby! Here we found the COOLEST stuff!
My purchases are below -
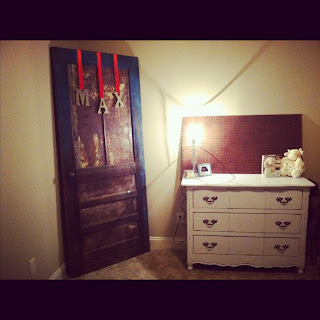
- An old door in the coolest shade of blue with the glass replaced by Tin - which I think looks somewhat leopard print, which I just think is just doubley cool.
- Two vintage windows
- *not pictured* An old Coca Cola box thingy dated 1972, which is now used in our kitchen.
We walked away spending less than $100 and gaining a new found love for Flea Markets.
Step 3: A Dresser!
My mom really wanted to get Baby Max something for his nursery, and since my sweet mother-in-law already bought us a crib, she opted to drop a nice hunk of change on a dresser!
We decided to get a dresser for both storage and changing table purposes.
I LOVE the french handles and distressed edges.
Step 4: Organize furniture
Let's just say, this step is still pending, but we're playing around with this idea...
Let's just say, this step is still pending, but we're playing around with this idea...
Now that we have all the "big ticket" items, the "nesting" / Pinterest-ing kicks in.
First, I found a picture of a peg board used in a little boys room, which I thought was precious. I mean, what "man" doesn't need a peg board in his room, right? And look at the storage baskets! Practical!
After a trip to Home Depot and a full can of brown spray paint, I have myself a peg board.
I then realized Max needed his name in his room... because infants know how to spell.
After a trip to Hobby Lobby, some Krylon Antique Bronze and Gold Leaf spray paint, some ribbon and hot glue - Max can now rest assured that he is, in fact, in his very own room.
While the letters above were drying, I tried my hand at another Pinterest Inspired project - Repurposing a Cheap Lamp.
I had a cheap Dollar Tree Lamp that I had no place for in our new home. The base was black and the shade was burgundy.
I spray painted the base white, ripped off the shade, sprayed the frame Antique Bronze (bc I had some left over) and then painted the base with Metallic Silver Acrylic Paint.
Here it is, all thrown into one -
Sorry for the poor quality of the iphone shots. Hopefully we will get something a bit better to document Baby Max's life.
We plan to hang the peg board and store diapers and wipes in storage baskets.
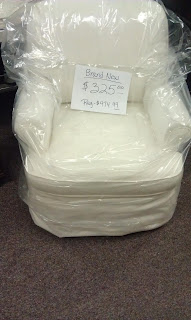
A chair will go beside the door with a reading lamp and small side table. Hoping to get this chair for a discounted price!
We will also install this chandelier. I LOVE chandeliers in nursery's. This one jumped out at me at Home Depot and I had to have it. Not too girly, but still on the "nursery" side with the beading. I'm dying for the 6-light version of this for our bedroom.
Now, what to do with this side?
I have other ideas for the opposing wall by the door, but this post has gone on long enough. I'll post more ideas as well as our bedding in another post to come.


Wow those are some great picks you ended up with!
ReplyDeleteLOVE Max's room!!!
ReplyDelete